More than ever, production cost control affects the operations of the Maintenance Department.
While its role still consists in knowing the health condition of the machines, its associated costs must remain as low as possible. For the operator, the ideal situation is then to have versatile tools that can deliver fast and reliable diagnosis: simple instruments to solve 80% of the drifts and more advanced instruments for the remaining 20%. A combination of vibration and ultrasound techniques in the same instrument? Problems are detected by static measurements while dynamic measurements are used when a further diagnosis is required.
Cost control
The current economic situation imposes maximum production cost control to companies. To this aim, they use more and more performing, hence more and more complex, facilities. Their aim is obvious: produce more and better. But that’s not all. Companies also naturally tend to optimize the maintenance of their process, which has then a whole new dimension. Not only do they have to limit production losses, plan and optimize reconditioning, while limiting the stock of spare parts, but they also have to achieve this mission with reduced human and financial resources. They can no longer waste workers’ hours doing time-consuming data collections and unnecessary analyses. Taking these aspects into account, SDT’s Vigilant equipped with CONMONSense sensors is a solution that will allow for the continuous collection of data without the need for staff to collect measurements, all information are automatically available on the embedded Vigilant software so the Condition Monitoring (CM) team can analyze them sitting at their desks.
Towards optimized maintenance
Let’s address the issue in a different way: why spend time to collect and analyze measurements or why entrust a specialist to do this work, if we finally find that the equipment is in good condition? Quite ineffective, don’t you think? Well, this is the case for 80% of the equipment under monitoring. The search for optimization requires the use of a tool that is simple (hence available to the largest number of users), fast (to limit collection time) and efficient (to confirm the proper operating of 80% of the machinery). But that’s not all. Out of the 20% of suspicious machines, the cause of the drift is easy to solve for 80% of them. Once again, a simple tool used by an operator is the most suitable solution. Finally, further diagnosis is required for 20% of the remaining 20%. In other words, let’s say that out of 1000 machines, 200 might have problems. Of those 200 machines, 160 will have problems that are easy to fix. And of the remaining 40 suspect machines, 8 will require further diagnosis. Advanced measurements carried out by a specialist are then necessary.
Versatility is essential
Besides speed and ease of use, a versatile tool must be selected based on controlled investment costs. A measuring instrument that can address both rotating machinery and control of energy costs. The complementarity between ultrasound and vibration makes full senses here. Ultrasonic technology is the undisputed champion of energy savings: compressed air, vapor and, to some extent, partial discharges.
For rotating machines, this is the simplest solution to detect friction phenomena (bearing lubrication), impact phenomena (bearing defects, including slow bearings, and gear defects) and bubble explosion phenomena in liquids (valve or pump cavitation). Vibration measurements are ideal to detect misalignment, unbalance, foundation, coupling and pulley problems, as well as aeraulic phenomena and defects affecting electric motors.
SDT340 relies on this approach, which combines vibration and ultrasound techniques: a basic tool for those searching for optimization and efficiency of their maintenance program. Based on combined ultrasound and vibration techniques, this versatile measuring instrument allows addressing both energy cost control and rotating machine monitoring. The technician can detect anomalies, both simply and quickly, using static measurements. Also, SDT340 benefits from advanced features for the specialist in charge of the search for breakdown causes using dynamic measurements.

Static measurements to detect problems
Static measurements (or overall measurements) are easy to implement because their result is a number. They are collected by the technician or operator in charge of lubrication and make up the basis of a maintenance program. They allow creating trend curves and implementing alarm thresholds. They aim at making a quick decision on the condition of the machine: good or suspicious.
Here are two concrete examples:
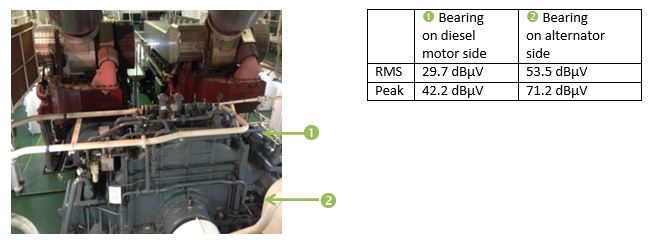
- The first example deals with a reducer of the main transmission line on a ship. Static ultrasonic measurements allowed detecting a damage on one of the bearings:
- The second example deals with a fan, still on the same shift. The overall measurement evidenced a velocity of 5.82 mm/s in the 10-1,000 Hz range, higher than the 4.8 mm alarm threshold recommended by the ISO 10816-3 standard. As in the previous example, the static measurements allowed the technician detecting the suspicious behavior of this fan.

In both examples, the technician performed on-site acquisition of the signals originating from the incriminated machines. They were analyzed by a specialist who did not have to travel on site uselessly.
Dynamic measurements for further diagnosis
The dynamic measurement consists of signal acquisition over a selected period. It allows generating time and frequency representations (FFT). With ultrasonic technology, time representation is preferred. For instance, it can be used to detect the presence of repeated shocks through simple visual interpretation. Based on bearing reference and rotation speed, the operator will be able to identify the defect origin. Finally, from shock amplitudes, he/she will assess the defect severity.
With vibration technology, frequency representation is more commonly used. Machine kinematics and knowledge of the defect vibration images will allow the specialist determining the cause of the breakdown. As previously, the severity of the defect and its development will be assessed based on the amplitudes of the spectrum lines.
Here are two concrete examples:
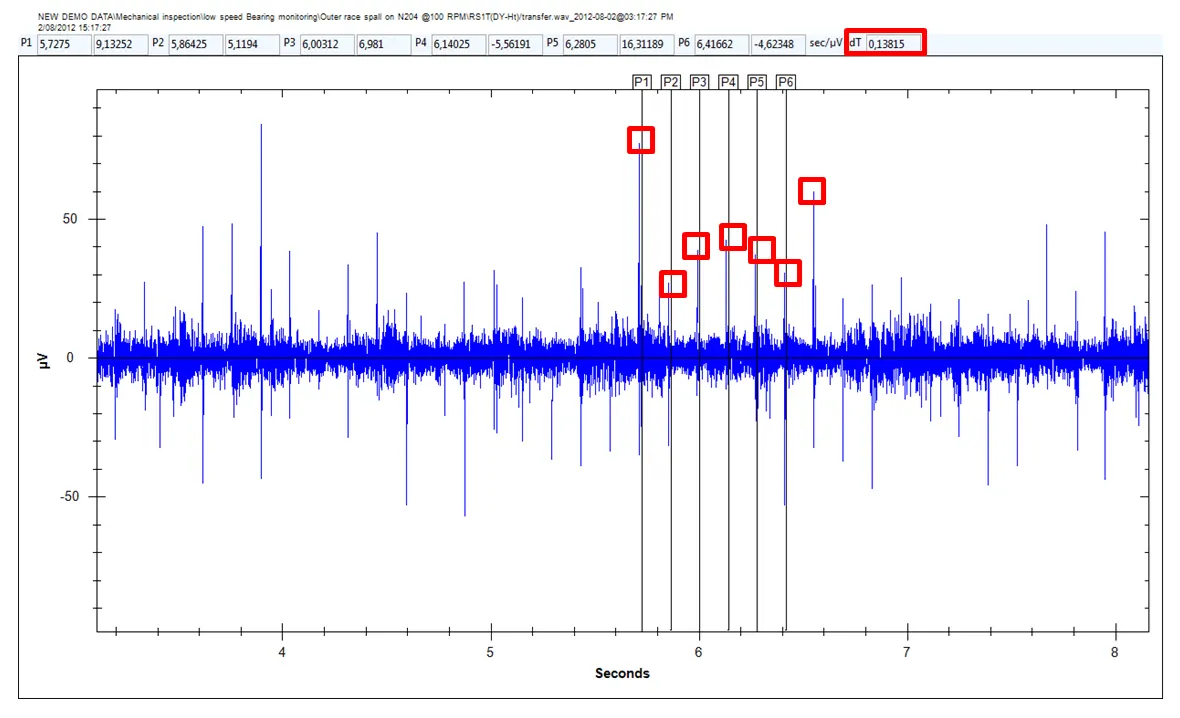
- The first example deals with the scaling of a bearing. The time representation of the ultrasonic signal shows the occurrence of repeated shocks every 0.138 second corresponding to the outer ring defect frequency.

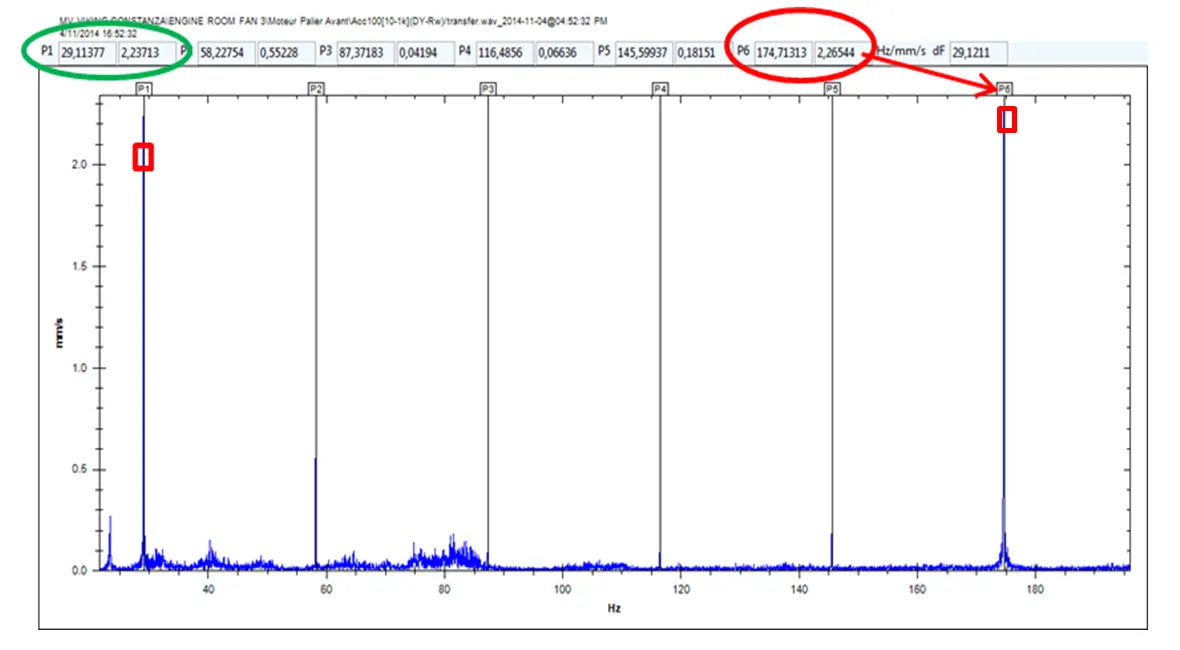
- The second example deals with a fan. The velocity spectrum can be used to detect unbalance through the presence of a peak at the rotation frequency of the machine, i.e., 29.11 Hz, and a welding problem on one of the 6 fan blades through a peak at harmonic 6 of the rotation frequency, i.e., 174.6 Hz.


